
In my last tutorial, I showed you how to design a landing page template from scratch via OptimizePress 2.0. In this post, I’ll show you how to create a squeeze page template.
Just in case you don’t know what’s a squeeze (opt-in) page, please read this post here.
In order to design a template from scratch, you need to have a rough idea of how you want your page to look like. You also need to know the elements that you’ll be adding.
Here are the 6 OP 2.0 elements that I’ve planned to use when designing my template:
- Images: A logo or banner place at the top
- Headline: A Headline and a sub-headline
- Image with Javascript Alert: Alert message pushing people to my opt-in form
- Bullet Block: A list of benefits that people will gain once they opt-in to my offer
- Arrows: Direct people’s eyes to the opt-in box
- Optin Box: Capture people’s email addresses
Click-By-Click Video Demonstration:
OptimizePress 2.0 elegant squeeze template formula:
[Row #1] Add A 1 Column Simple Layout: Click the pencil icon to edit the row options. Check Is it a full-width row box. Set the Row background color, Top and Bottom padding.
You need to do this for all the subsequent rows you add. I won’t be repeating this again.
Using the Images element, insert a logo and Center align it. Adjust the Width if needed.
[Row #2] Add A 1 Column Simple Layout: Using the Headline element, insert your catchy headline and sub-headline. Make sure the headline is bigger than the sub-head.
I’m using Google fonts: Raleway for the main headline (35px) and sub-headline (32px).
[Row #3] Add A 2 Columns Simple Layout: On the 1st column, add a fakeout image via Image with Javascript Alert element. Write an Alert Message asking people to opt-in. E.g. Please enter your contact below to get immediate access to [your incredible offer].
On the 2nd column, add a Bullet Block element and list down the benefits or features.
[Row #4] Add A 2/5 · 3/5 Layout: Using the Images element, add a customize down triangle image on the 3/5 column. Make sure the image matches your template design.
Preview your design. You might want to adjust the Alignment and Margin if necessary.
[Row #5] Add A 1/5 · 3/5 · 1/5 Layout: On the left 1/5 column, add an Arrow element pointing towards the opt-in form. Then add an Optin Box element onto the 3/5 column.
Integrate your preferred autoresponder and list. Change the Privacy Notice and Default Value if you want. Then customize a clear call-to-action Button for people to click on it.
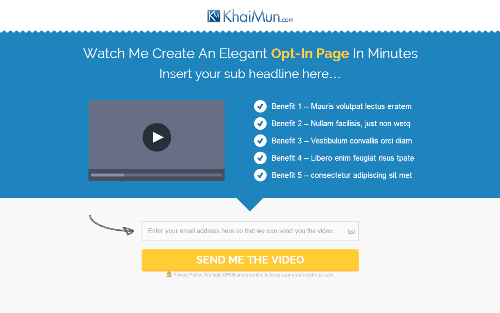
The Final Design Of OptimizePress 2.0 Squeeze Page Template
Click Show/Hide Controls to preview your design. Publish it once you are happy with it.
NEW! Create a 2-step opt-in process landing page:
Whoala! Now you get my ‘good enough‘ formula for building (from scratch) an elegant OptimizePress 2.0 squeeze page. I hope that you’ll find the instructions here useful.

» List Of All OptimizePress 2.0 Elements You Can Add In LiveEditor
» How To Create An Ultra Clean OP 2.0 Landing Page Template
» How To Create An OP 2.0 Membership Site In 5 Simple Steps
» How To Set Up An OP 2.0 Membership Site With OptimizeMember
» Design A Kajabi Style Membership Using Pre-Made Templates
» 40 CSS Code You Can Implement To Customize An OP 2.0 Blog
» How To Add Smooth Scrolling Effect To An OptimizePress Page
» How To Design A Beautifully Looking OptimizePress Navigation
» How To Build A Hamburger Style Mobile Menu In OptimizePress
» Visit OptimizeTemplates.com For More OP Pre-Made Templates
Comments on this entry are closed.
Nice job. I learned a few things from your lesson. Thank you!
Thanks John for visiting my blog.
I’ve just added a new video above on how to create a 2-step opt-in process using exactly the same elegant template.