
So yesterday I received an email from a customer asking whether I know of an easy way to have a menu at the very top, on click it would take you down to the right section of the page. Then he showed me a landing page template used by Pat Flynn to sell his ebook.
I quickly replied with step-by-step instructions on how he can do that with OptimizePress 2.0 platform. Later I thought it’d be a great idea for me to share this in my blog as a way to give back to my customers, and of course indirectly showcasing my Author template.
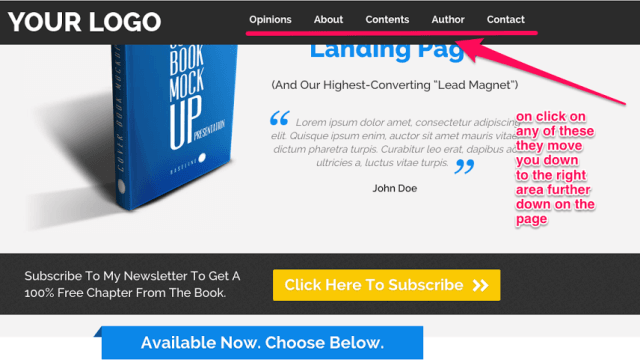
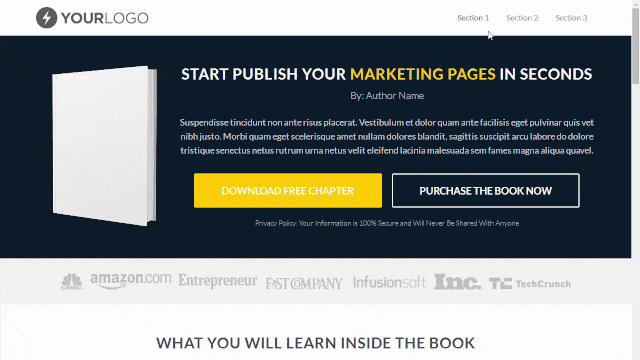
Screenshot I Received – The Customer Wanted A Smooth Scrolling Effect
Smooth scrolling is becoming increasingly popular these days. You will find it often used in one-page or infinite-scrolling sites, where the menu items (or buttons), upon click will scroll smoothly between sections on the same page. This is usually done using jQuery.
Let’s Add Smooth Scrolling To Your OptimizePress Site
#1 Set Up The WordPress Menu: In your WP Dashboard, go to Appearance and select Menus. You can either edit an existing menu or create a new menu:
- On your left, use the Links panel to add a custom link to your menu
- Insert #section1 to the URL field (#section1 is just an example here)
- Insert Section 1 to the Link Text field (Section 1 is just an example)
- Click Add to Menu. You will see it appear under the Menu Structure
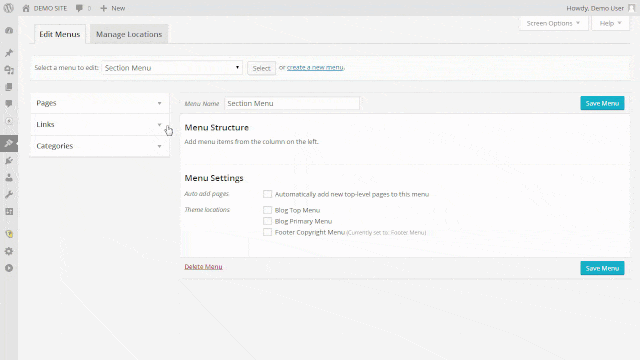
Step 1 – Setting Up Your Menu Structure Inside WordPress Dashboard
You can have as many sections you want. Once you are done, remember to Save Menu.
#2 Set Up The Menu In LiveEditor: In the OP LiveEditor, go to Layout Settings (top left) and turn ON the Header & Navigation. Under Navigation Bar Alongside Logo, select the Menu you have created in Step #1 for the navigation bar. Click the green Update button.

Step 2 – Assign The Menu You Have Created To The Navigation Bar
#3 Create The Internal Anchor Link: Depends on which section you want the menu item to link to, you need to first create an internal anchor link similar to the following format:
<a id=“section1”></a>
Note that the anchor location (in green) is similar to the hashtag value you set in Step #1. Then all you need to do is copy and paste the anchor link to the Row you want to link to:
- Click the Pencil Icon to edit the Row you wish to link to
- Insert the anchor link into the Code before row field
- Click the green Update button to update the changes
- Repeat Step #3 until you get all the anchor links set up
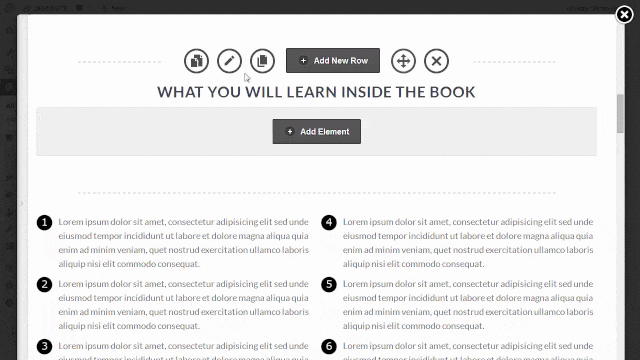
Step 3 – Edit The Row Options To Insert The Internal Anchor Link
#4 Add jQuery Snippet To The Page Footer: Click here to download the jQuery snippet
- Inside the LiveEditor, go to Page Settings (on your left)
- Click Other Scripts → Add New (if Footer isn’t there)
- Under the dropdown, select Footer and insert the jQuery
- Click the green Update button to update the changes
- Inside the LiveEditor, remember to click Save & Continue
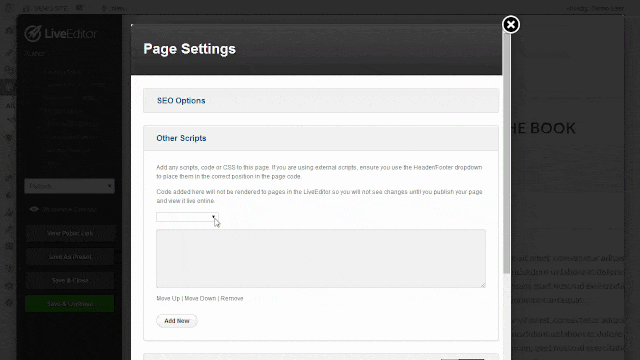
Step 4 – Copy & Paste The jQuery Snippet To The Page Footer
Alternatively, you can also insert the jQuery snippet using the JavaScript element in OptimizePress. Either one will work fine. Here is what the outcome should look like:
Yep, You Can Use Smooth Scrolling In Your OptimizePress Site
Oh, keep in mind that you can also link a Button, an Image, a Hyperlink to any section of your page. All you need is insert the hashtag value (e.g. #sectionX) in the Link URL field.
That is all I have for you now. I hope you will find this tutorial useful. If you are a customer of mine, leave me a quick shout-out below. I’m always excited to hear from my buyers.

» List Of All OptimizePress 2.0 Elements You Can Add In LiveEditor
» How To Create An Ultra Clean OP 2.0 Landing Page Template
» Watch Me Design An Elegant Squeeze (Opt-In) Page Template
» How To Create An OP 2.0 Membership Site In 5 Simple Steps
» How To Set Up An OP 2.0 Membership Site With OptimizeMember
» Design A Kajabi Style Membership Using Pre-Made Templates
» 40 CSS Code You Can Implement To Customize An OP 2.0 Blog
» How To Design A Beautifully Looking OptimizePress Navigation
» How To Build A Hamburger Style Mobile Menu In OptimizePress
» Visit OptimizeTemplates.com For More OP Pre-Made Templates
Excellent article! I love your work. I have purchased a few templates on the marketplace.
Thanks for your words of encouragement. Let me know if I can be of any help to you.
I was searching exactly for this solution with OptimizedPress for one of my sales pages. I implemented your steps and it works! Thanks so much!
You’re welcome Bernd. Glad you find the information here useful.
Thank you for the tutorial. For some reason I’m having a problem with the section 3 I made. Still not sure how to fix it, but I learned a lot from your tutorial!
Hello Deborah,
Reach out to me here and I’d be happy to help you out.
Thanks so much for all your help! :)
No worries. Glad I could help a little.
Thanks so much KM! Worked like a charm!
Dang KM, you’re one smart dude! Thank you for the tutorial!
Any tricks on how to make the OP2 lessons respond and act more like a LMS?
Is it just me or did the smooth scrolling break with the latest update? It was working on my site just fine and now stopped. Anyway, Thanks KM for what you’ve shared here!
The jQuery snippet has changed slightly with the recent WP 4.5 update.
Awesome! Thanks KM!!!
Was there another OP update or is this just me that the snipped doesn’t work? I’ve tried the slightly changed snippet as well. No smooth scrolling just jumping to the Link. Can you help me?
Hi KM Lee,
Thanks for the update. It took me 3 days digging around until I realise that the scrolling script was broken. The old script also conflicts with the royalslider.
THANKS!!
Hi Lee,
How about scrolling Back to Top Button?
Kindly teach us how to do it. Thanks :D
There are already some good tutorials out there. Just do a quick Google search about scroll to top WordPress. The easiest way is to install a plugin for this.
Thanks for writing this tutorial!
Hi Lee,
Your tutorial is really beneficial for me. Thanks a lot. Hope to learn more tutorial from you since i’m also using OptimizePress.
Hey KM, thanks so much for this tutorial! You made it so super simple to apply. Love your work.
Thanks Man! This is great!